Automatically Generate SEO-friendly Meta Description Tags for Hexo + NexT Theme Blogs
I write my blogs in Obsidian and then generate static web pages through Hexo + Next.
Recently, I found that search engines were indicating that my blog web pages lacked the <meta name="description" content="xxxxx"> tag and were marked as having an error, which is not conducive to being promoted by search engines. So, I decided to add the description tag to my blog pages.
After searching online, I discovered that the Hexo + Next method doesn’t seem to directly support customizing the description tag for each blog post. So, I simply asked Claude 3.5 Sonnet.
My question was: I have a static blog built with the Hexo tool and the Next theme. However, by default, the generated static pages do not contain the <meta name='description' content='Descriptive, keyword-rich text that talks about the page content goes here.'> tag, which is not good for SEO. I want to add this tag to each blog post. What should I do?
Claude 3.5 Sonnet’s answer to me was:
1 | To add a description meta tag to each blog post in the Hexo + NexT theme, you can follow these steps: |
I tested this method and found it didn’t work. The description tag couldn’t be generated as expected. Later, I found out that it was because the page.description parameter couldn’t be used in head.njk, probably due to the issue of template variable scope.
I then tried adding the template code for generating the description tag in the head section of themes/next/layout/_layout.njk. After all, layout is the top-level template, and all parameters should be available here. After the update, the head section of _layout.njk is as follows:
1 | <head> |
Testing showed that this method worked.
Now, there is a solution on the Hexo + Next side. However, the premise of this solution is that the Front Matter of the blog file should contain the description tag, and the content should be suitable for SEO.
I then thought of using large language models (LLMs) to help me generate suitable description content. So, I manually copied the blog content from Obsidian one by one into the LLM’s conversation window in the browser, and then wrote the description value returned by the LLM into the Obsidian file. After doing this for seven or eight blog posts, I gave up because I have over 100 blog posts. It would take a long time to do this, and what about in the future? Do I have to keep doing it like this?
The night before last, I couldn’t fall asleep in bed. Thinking about this problem, I suddenly thought that I could create an Obsidian plugin to assist in this process.
In the process of using LLMs to assist in generating descriptions mentioned above, the troublesome part is the repeated copying and pasting of text between Obsidian and the browser. The logic of the plugin only needs to automate this operation, which seems relatively simple.
Yesterday, it took me over two hours to create this plugin. The code is here: seo_friendly_description_geneater. Currently, it hasn’t passed the official review of Obsidian, so it can’t be found in the plugin marketplace yet.
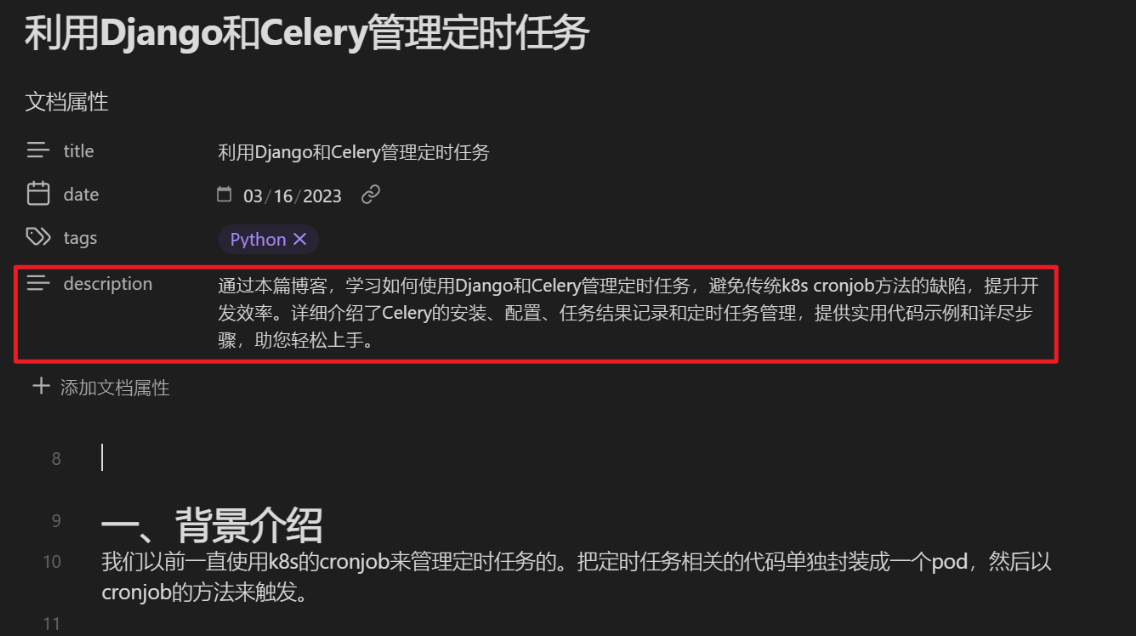
A preview of the plugin’s effect is shown in the part marked by the red box in the figure.
The plugin currently only supports OpenAI and Azure OpenAI.
| Parameter Name | Description | Type | Default Value |
|---|---|---|---|
| apiKey | The key required to call the LLM | string | None |
| useAzure | Whether to use Azure OpenAI | string | false |
| apiUrl | The call interface of the LLM. If useAzure is True, this parameter should be filled with the endpoint address of Azure OpenAI in the format: https://xxxxx.openai.azure.com/ | string | https://api.openai.com/v1/chat/completions |
| model | The name of the LLM. If useAzure is True, this parameter doesn’t need to be filled | string | gpt-3.5-turbo |
| maxTokens | The maximum number of tokens generated by the LLM | number | 150 |
| temperature | The temperature of the LLM generation | number | 0.8 |
| azureApiVersion | The Azure API version. When useAzure is False, this can be left blank | string | 2023-05-15 |
| azureDeploymentName | The Azure deployment name. When useAzure is False, this can be left blank | string | None |
When using it, first open the markdown file for which you need to generate a description, then search for “seo” in the Obsidian command line. The following command will appear, and you can click it.
You can also bind a shortcut key for convenience. For example, I bound it to Ctrl + Alt + O here.
[ )
)